A rugby jersey has more design decisions packed into it than almost any other team garment, and most of them are made before a single color is chosen. Fabric, fit, decoration method, and lead time are all locked in early, and a club that skips those questions to jump straight to logos usually ends up with a kit that looks right on screen but wears wrong on the pitch. This walkthrough goes step by step through how to design a custom rugby jersey, in the order the choices actually matter, so your club ends up with a shirt players want to pull on and supporters want to buy.
Start with how the jersey will be used
Before anything else, decide what the shirt is for, because that single answer drives every other spec. A first-team match jersey needs a close body-fit cut, tough seams, and cloth that resists a grab and rip in contact. A supporter or replica shirt can be looser, softer, and built for the stands rather than the scrum. Training and tour shirts sit somewhere in between, prioritizing comfort and cost over contact durability. It is common for a club to order all three from the same core design but in different fabrics and fits, so the crest and colors stay consistent while each shirt does its own job. Age-grade and junior sides add another wrinkle, since younger players need a more forgiving cut and often a softer, lighter cloth than the senior match shirt. Settle the use case first and the rest of the decisions narrow themselves down quickly, because a spec that is right for a supporter shirt can be exactly wrong for a front-row forward.
Choose the fabric and weight
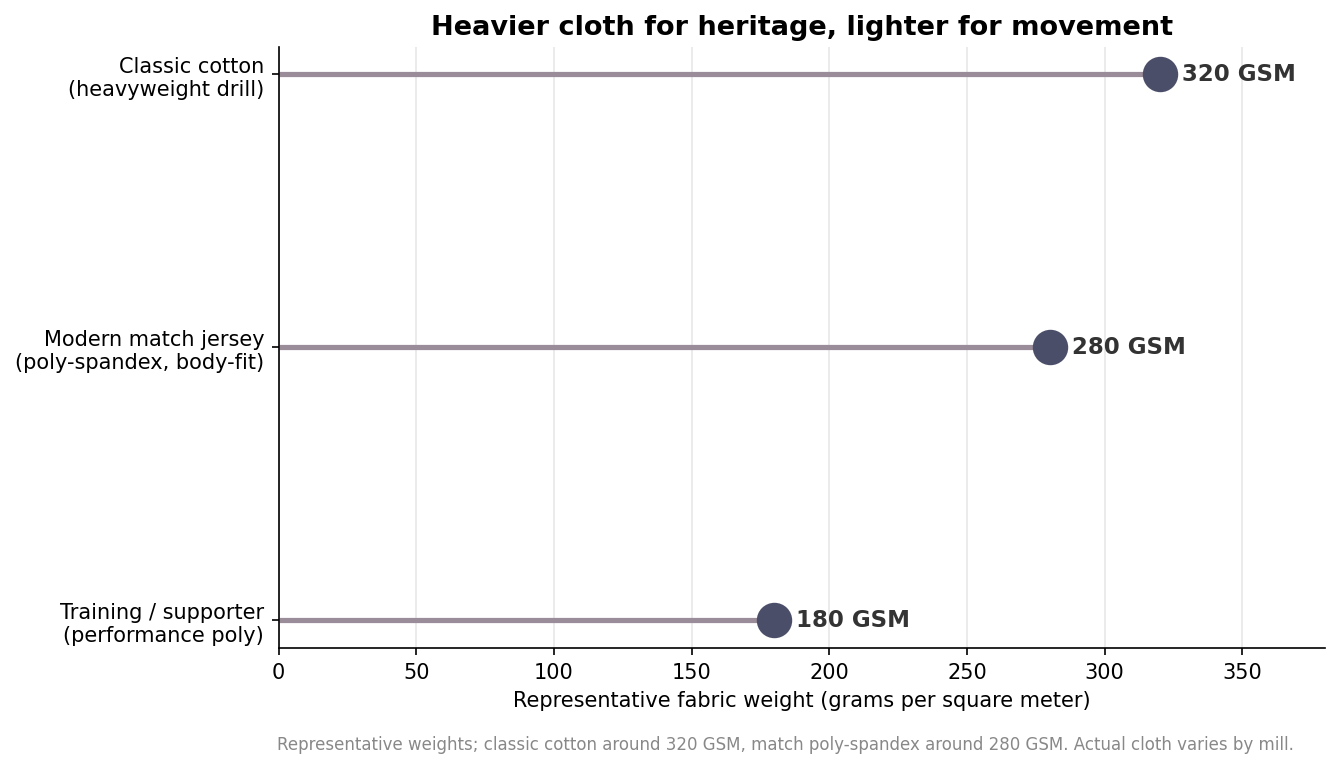
Rugby cloth splits into two broad families. The traditional route is a heavyweight cotton drill, often around 320 grams per square meter, with a stiff twill collar and rubber buttons — the heritage look that supporter and classic shirts still lean on. The modern route is a polyester or polyester-spandex knit, commonly near 280 GSM for a match jersey, engineered to stretch, wick sweat, and spring back into shape after a tackle. Training and replica shirts often drop lighter still, near 180 GSM, trading contact toughness for breathability and a lower price. The chart below shows how those weights compare. Heavier is not automatically better: a 320 GSM cotton shirt looks and feels premium but soaks up water and gets heavy in the rain, while a lighter performance knit stays dry but shows wear faster. Match the cloth to the job you defined in the first step.
Pick the decoration method early, not late
How your artwork gets onto the shirt determines what the artwork can be. Full-color gradients, all-over patterns, and sponsor-heavy fronts essentially require dye sublimation, where the design is printed into the fabric of a made-to-order shirt. Simpler crests, numbers, and names can be heat-pressed or embroidered onto a stock jersey, which is faster and cheaper but limits how much color you can cover. Cut-and-sew construction with sewn twill appliqué sits in the middle, giving a durable, traditional finish for names and numbers. This choice interacts with fabric: sublimation only works well on polyester, so a classic cotton shirt rules it out. Decide the method here and design within its limits rather than falling in love with artwork your chosen process cannot reproduce.
Lay out the design elements
With fabric and method fixed, the visual design finally comes into play, and a few rules keep it from going wrong. Keep primary and secondary colors to a clear hierarchy so the jersey reads at a distance on the pitch and in a crowd. Leave deliberate, protected space for the crest, the front sponsor, and the back number, and make sure the number stays legible against whatever pattern sits behind it — a busy hoop or camo panel can swallow a digit at range. Confirm any sponsor logos in vector format up front, since low-resolution art is the single most common cause of a delayed proof. If you are numbering a full squad, plan the size run and the name list at design time, because adding names later almost always costs a second setup fee. It also pays to think about collars and cuffs here: a traditional rubber-button collar signals heritage, while a bound crew or self-fabric collar reads modern and sits flatter under a scrum cap. These small trims are easy to overlook on a flat mock-up but are the details players notice first when the shirt is on.
Sizing, minimums, and lead time
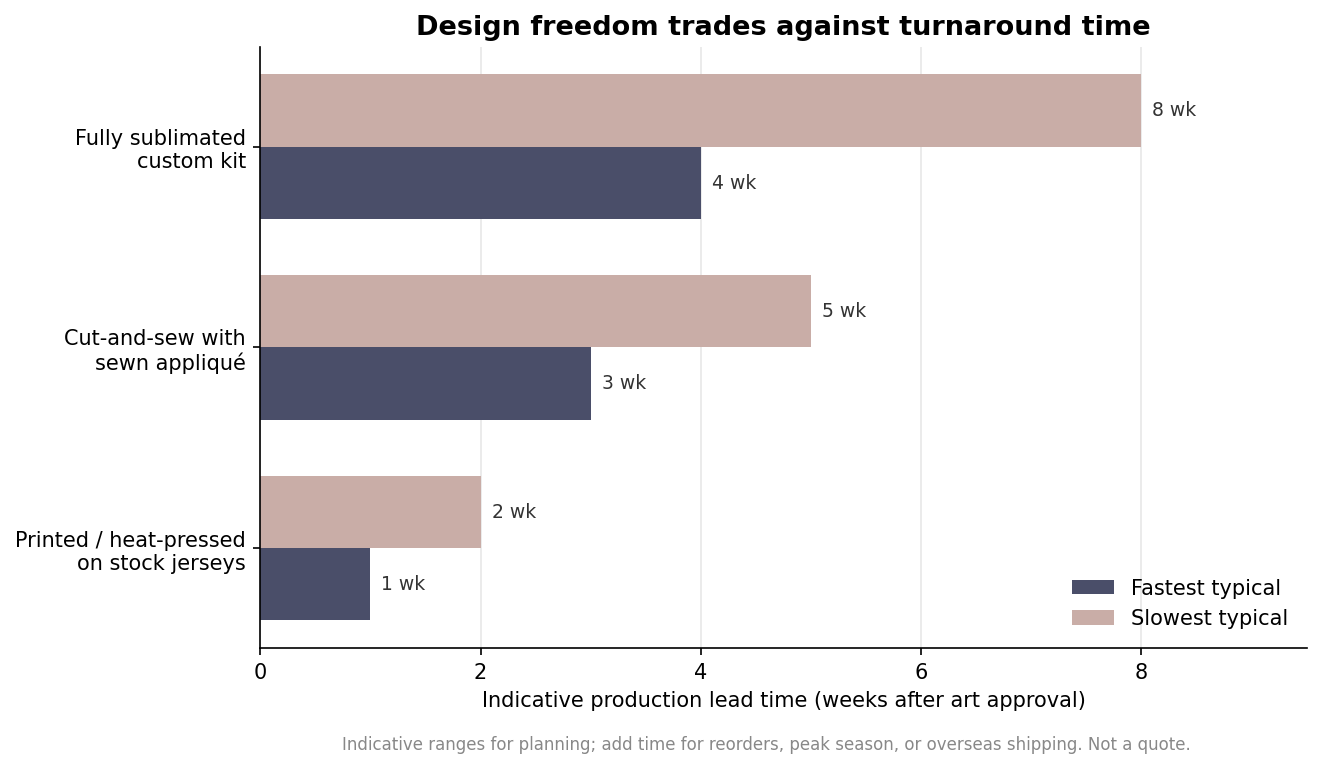
The last step is the one clubs most often underestimate: how long the shirt takes to make. Printed or heat-pressed jerseys on stock blanks can turn around in a week or two, cut-and-sew work runs longer, and a fully sublimated custom kit commonly takes four to eight weeks after art approval once you account for production and shipping, as the chart below shows.
Minimums scale the same way — sublimated kits usually carry a higher piece minimum than decorating stock shirts, because the factory is making the garment from scratch. Order a full size run of samples before committing a squad order, since rugby fits run tight and a “large” varies between suppliers. Build in a buffer of a couple of weeks beyond the quoted lead time for reorders, peak-season backlogs, and the inevitable last-minute roster change. Get the sequence right — use, then fabric, then method, then design, then timing — and the jersey that arrives will be the one you actually designed.